

How Can You Display Photography in Rentals Without Damaging Walls?
Last Updated: October 25, 2026
Quick Summary
Display photography rentals using adhesive strips, removable hooks, or picture rails that bond temporarily and remove cleanly without damaging walls. Match your hanging method to your wall type and artwork weight, most fine-art photographs weigh 2 to 8 pounds and work well with adhesive strips rated for 5 to 15 pounds. Plan your layout with painter's tape, follow careful removal steps, and document wall condition before and after to protect your deposit.
- Adhesive strips hold 5 to 15 pounds and suit single prints or small gallery arrangements on smooth drywall.
- Picture rails and ledge systems let you rearrange artwork without touching the wall again.
- Clean walls with rubbing alcohol and wait 24 hours after applying adhesive strips before hanging artwork.
- Remove adhesive strips slowly at a 45-degree angle after warming with a hair dryer on low heat.
- Document wall condition with dated photos before hanging anything and keep receipts for any repair materials.
Table of Contents
- Why Renters Need Damage-Free Display Solutions for Photography
- How to Hang Pictures Without Nails in Rental Spaces
- Gallery Wall Layout Ideas for Rental Walls
- Damage-Free Picture Hanging Ideas That Protect Your Deposit
- Leaning Art on Shelves as a Renter-Friendly Alternative
- Removing Hanging Products and Repairing Marks Before Move-Out
- Choosing Photography That Works in Your Rental Space
- Frequently Asked Questions
Why Renters Need Damage-Free Display Solutions for Photography
Renting means no paint, no drilled holes, no marks, but fine art can make your space feel like yours without risking your lease.
Adhesive strips, removable hooks, and ledge systems let you build a gallery wall without permanent damage.
At Magick Brush, we help renters anchor their spaces with intentional fine-art photography.
The best display photography rentals combine three things: the right adhesive or hardware for your wall surface, a weight-appropriate mounting system, and a removal strategy that protects your deposit.
How to Hang Pictures Without Nails in Rental Spaces
Hanging pictures without nails is the renter's foundation, no permanent marks. Match your method to your wall type and artwork weight: a lightweight print on drywall behaves differently than a heavier framed piece on textured plaster.
Adhesive Strips and Removable Hooks
Adhesive strips are the first choice for most renters: they bond temporarily and remove cleanly without peeling paint or leaving residue.
Here's how to use them correctly:
- Clean your wall with rubbing alcohol and let it dry completely
- Cut the adhesive strip to the size recommended on the package
- Press firmly for the time specified (usually 30 seconds to 1 minute)
- Wait the full curing time before hanging your artwork (typically 24 hours)
- When removing, pull slowly at a 45-degree angle to the wall
Weight limits matter. Most adhesive strips hold 5 to 15 pounds, and a framed fine-art photograph typically weighs 3 to 8 pounds, so strips suit single prints or small gallery arrangements.
Watch out: If your wall is freshly painted, textured, or damaged, adhesive strips may not hold. Test on a small area first or choose an alternative method.
Picture Rails and Ledge Systems
Picture rails and ledge systems are a renter-friendly alternative. Mounted with removable hooks or strips, they let artwork hang from the rail using wire or cord, and you can rearrange, add, or remove pieces without touching the wall again.
To set up a picture rail system:
- Measure and mark where you want the rail to sit (typically 12 inches from the ceiling)
- Use removable adhesive strips or hooks to secure the rail to the wall
- Hang your artwork using the rail's hanging system
- Adjust spacing and arrangement as needed
Ledge systems work similarly but sit on a horizontal surface, ideal for renters who want to display photography without any wall attachment at all.
Gallery Wall Layout Ideas for Rental Walls
A gallery wall doesn't require permanent installation, you can create a stunning arrangement using only damage-free methods. The key decision is your layout pattern: symmetrical arrangements feel formal and grounded; asymmetrical layouts feel modern and dynamic.
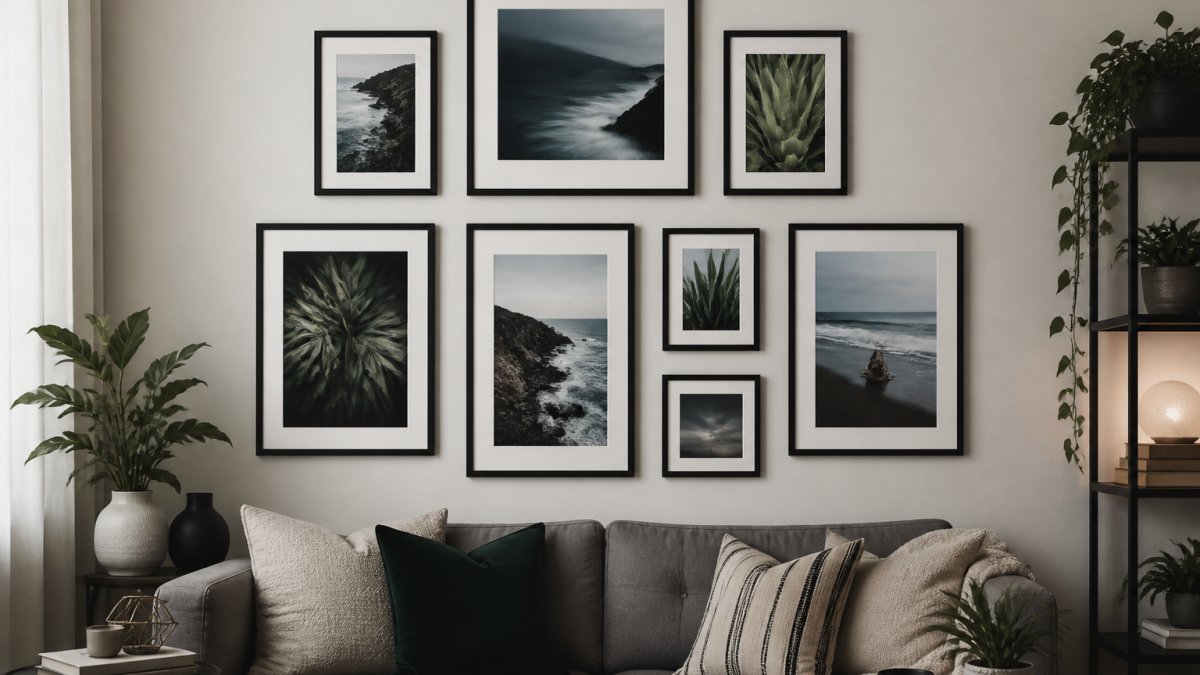
Here are the most popular gallery wall layouts for rental spaces:
- Grid layout: Equal spacing in rows and columns. Creates order and visual balance.
- Salon style: Mixed frame sizes arranged organically. Feels curated and intentional.
- Linear arrangement: Pieces aligned horizontally or vertically. Works well on narrow walls.
Start with a template. Measure your wall space, sketch your arrangement on paper, then use painter's tape to mark where each frame will hang.
Damage-Free Picture Hanging Ideas That Protect Your Deposit
Your deposit depends on leaving your walls in move-in condition: no holes, no marks, no residue. Damage-free hanging starts with prevention, choose your method carefully, follow installation steps precisely, and remove everything properly when you leave.
Preparing Your Rental Walls Before Hanging
Clean walls hold adhesive strips better and show damage less. Here's your preparation routine:
- Dust the wall with a dry cloth to remove loose particles
- Wipe with a cloth dampened in rubbing alcohol
- Let dry completely (at least 30 minutes)
- Inspect for existing damage and note it
- Take photos of the wall before hanging anything
This takes 15 minutes and increases adhesion while making removal easier later. If your wall has texture, adhesive strips may struggle, use picture rails or lean artwork on shelves instead.
Weight Limits and Secure Mounting Without Damage
Understanding weight limits keeps your artwork secure and your walls safe. Here's a quick reference for common display methods:
| Display Method | Weight Limit | Best For | Wall Type |
|---|---|---|---|
| Adhesive strips | 5-15 lbs | Single prints, small groupings | Smooth drywall |
| Removable hooks | 10-25 lbs | Framed artwork, heavier pieces | Smooth drywall |
| Picture rails | 20-50 lbs | Gallery walls, flexible arrangements | Any wall |
| Ledge systems | 10-30 lbs per ledge | Display without hanging | Any wall |
Most fine-art photography prints weigh 2 to 8 pounds. A 16x20 unframed print on museum-quality paper weighs around 4 pounds; a standard frame adds 3 to 5 pounds. Lightweight unframed prints can hang from adhesive strips, while heavy framed pieces need removable hooks or a picture rail.
Leaning Art on Shelves as a Renter-Friendly Alternative
Not every piece needs to hang. Leaning artwork on shelves, dressers, or floating shelves is a damage-free method renters often overlook, and it lets you rotate pieces seasonally without touching the wall.
To lean artwork properly:
- Place the frame on a flat surface at a slight angle (about 15 degrees)
- Lean it against the wall or a small stand
- Make sure it's stable and won't tip
- Step back and check the visual balance
Leaning works best for pieces 16x20 inches or smaller; larger artwork becomes unstable. Place a small rubber wedge or furniture pad behind the frame to prevent slipping. It suits renters who move frequently, zero installation, zero removal.
Removing Hanging Products and Repairing Marks Before Move-Out
Removal is where most renters make mistakes, ripping off adhesive strips too quickly can peel paint. Safe removal is only half the job; you also need a move-out strategy that satisfies your lease and landlord.
Step-by-Step Adhesive Removal
Here's how to remove adhesive strips safely:
- Warm the adhesive with a hair dryer on low heat for 30 seconds. This softens the bond and reduces the chance of paint lifting.
- Gently pull one corner at a 45-degree angle to the wall. Keep the strip close to the wall as you pull, pulling straight out increases paint damage risk.
- Work slowly around all edges. Rushing is the number one cause of paint tears.
- If residue remains, use a rubber eraser or an adhesive remover designed for your wall type. Test any remover on a hidden spot first.
- Wipe clean with a damp cloth and let dry completely before inspecting.
For removable hooks, follow the same approach. Heat helps loosen the adhesive, and slow, angled pulling prevents paint damage.
Troubleshooting Paint Failure
Even with careful removal, paint can lift, most often when the wall was freshly painted (most paints need 7 to 30 days to cure before adhesive is applied), textured or dirty, or when adhesive was left on for years.
If paint lifts:
- Small peel (less than a quarter): Use spackling compound to fill, sand lightly, and touch up with matching paint. Most landlords accept this as normal wear.
- Larger peel or exposed drywall: Don't try to hide it. Document the damage with photos and notify your landlord promptly. In many leases, you are responsible for restoring the wall to move-in condition, but some allow normal wear and tear.
- Residue that won't budge: A product like Goo Gone or rubbing alcohol can help, but test first. Never use harsh chemicals or abrasive scrubbers on painted walls, they can damage the finish and make repairs more obvious.
Lease, Landlord, and Move-Out Checklist
Your deposit depends on leaving your walls in move-in condition, no holes, no marks, no residue, and a paper trail. Before you hang anything:
- Read your lease. Look for clauses about wall damage, adhesives, and move-out condition. Some leases prohibit adhesive strips entirely; others allow them if removed cleanly.
- Get written permission if you're unsure. A quick email to your landlord asking about removable hooks protects you later.
- Document wall condition with dated photos before you hang anything. Note any existing damage so you aren't blamed for it.
At move-out:
- Remove all hanging products using the steps above.
- Repair any small holes or marks with spackling compound, sand lightly, and paint over with matching wall color.
- Take dated photos of the restored walls.
Renters who document condition and communicate proactively typically get their full deposit back, even if minor wear occurred. Treat the wall as someone else's property from day one.
Choosing Photography That Works in Your Rental Space
The artwork you choose matters as much as how you hang it. Explore related guidance on selecting fine art specifically suited to rental living situations For photography, think about print size, matting, frame consistency, and how pieces relate to each other on the wall. See how photography displays work in a specific room context relevant to many renters
Print Sizes and Scale
Scale is the most common mistake renters make. A small print on a large wall feels lost. An oversized print on a small wall feels cramped.
Here's a practical guide for common wall spaces:
- Small walls (under 3 feet wide): One 8x10 or 11x14 print, or a tight cluster of two to three small prints.
- Medium walls (3 to 6 feet wide): A single 16x20 or 18x24 print, or a gallery wall of four to six pieces in mixed sizes.
- Large walls (over 6 feet wide): One large statement piece (24x36 or larger) or a salon-style arrangement of six to nine pieces.
For gallery walls, a common rule is to fill about 60 to 75 percent of the available wall width. That leaves breathing room without feeling sparse.
Matting and Frame Consistency
Matting adds visual space around the photograph and makes a small print feel more substantial, but it also adds weight, a matted and framed 16x20 print can weigh 5 to 8 pounds, versus 3 to 4 pounds unmatted in a thin frame.
For rental-friendly displays, consider these frame choices:
- Consistency wins. Use the same frame style and color across a gallery wall. This creates cohesion even when the photographs vary in subject or size.
- Lightweight frames (thin metal or simple wood) reduce the load on adhesive strips and hooks.
- Acrylic glazing instead of glass reduces weight and is less likely to shatter if a piece falls, a real concern in rentals where you may be using adhesive rather than studs.
If you're mixing frame styles, limit yourself to two complementary finishes (e.g., black and natural wood) and repeat them across the arrangement.
Spacing and Layout for Photography
Spacing makes a gallery wall feel curated rather than random. For photography, tighter spacing often works better because it lets the images read as a single composition.
- Between frames: 2 to 3 inches for small groupings, 2 to 4 inches for larger arrangements.
- Above furniture: Leave 6 to 8 inches between the bottom of the lowest frame and the top of a sofa or console.
- Centered at eye level: The center of the arrangement should sit around 57 to 60 inches from the floor, the average eye level.
Start with a template. Measure your wall space and sketch your arrangement on paper first. Use painter's tape to mark where each frame will hang. This prevents mistakes and lets you see the layout before committing.
Cohesion Without Matching
A renter-friendly gallery wall doesn't require identical pieces. Instead, create a visual thread:
- Color palette: Choose photographs that share a tonal range, all cool blues, all warm earth tones, or a consistent black-and-white series.
- Subject: Botanical, coastal, abstract, or architectural themes create instant cohesion.
- Scale rhythm: Mix one large piece with several smaller ones, but keep the overall arrangement balanced.
Fine-art photography that celebrates nature works well in rentals because it feels timeless and calming. Pieces like Between Sea and Sky or The Green Passage bring grounding energy without feeling trendy, anchoring a space and inviting presence, which matters when you want your temporary home to feel intentional.


If your rental is small or minimalist, one large statement piece often works better than multiple smaller ones. If your space is larger or eclectic, a gallery wall of 4 to 6 pieces creates visual interest without overwhelming the room.
Frequently Asked Questions
What adhesive products work best for displaying photography in rentals?
Removable adhesive strips, hook-and-loop tape, and damage-free picture hooks are the safest options for rental walls. Look for products specifically labeled as renter-friendly that won't peel paint when removed. Always test on a small, inconspicuous area first. Washi tape and command-style adhesive strips work well for lightweight prints, while stronger adhesive hooks can support heavier framed photographs. Check your lease before applying any adhesive to confirm landlord permission.
How can I display large photographs without hanging them?
Leaning art on shelves, dressers, and windowsills offers a damage-free way to display photography in rentals. Use museum putty or small felt pads to keep prints stable and prevent sliding. Floor-standing easels work for larger pieces. Picture rails mounted on the wall with adhesive strips can also hold photographs without nails. These methods let you rearrange and move your gallery whenever you want without leaving holes or marks.
Can removable adhesive strips hold framed photographs securely?
Yes, removable adhesive strips can hold lightweight to medium-weight framed photographs when used correctly. Choose strips rated for your frame's weight, typically 5-20 pounds per strip depending on the product. Use multiple strips for larger frames to distribute weight evenly. Ensure your rental wall is clean and smooth before application. For heavier framed prints, consider damage-free picture hooks that distribute weight across a wider area without penetrating the wall.
What should I check before using adhesive hooks in a rental?
Review your lease to confirm whether adhesive products are permitted. Inspect your wall surface for paint quality, wallpaper, or texture that might affect adhesion. Test a small hook in a hidden spot first. Avoid applying adhesive to freshly painted walls (wait 30 days if possible). Clean the wall with rubbing alcohol and let it dry completely before hanging. Keep all product packaging and removal tabs for move-out. If you damage the wall despite precautions, have spackle and touch-up paint ready for repairs.
Displaying photography in rentals doesn't mean accepting blank walls. The right combination of damage-free hanging methods, thoughtful layout, and intentional artwork choices lets you create a space that feels grounded and alive. Start with clean walls, choose your hanging method based on weight and wall type, and remove everything carefully when you move. Your deposit, and your sense of home, depends on it.
